 Skip to content
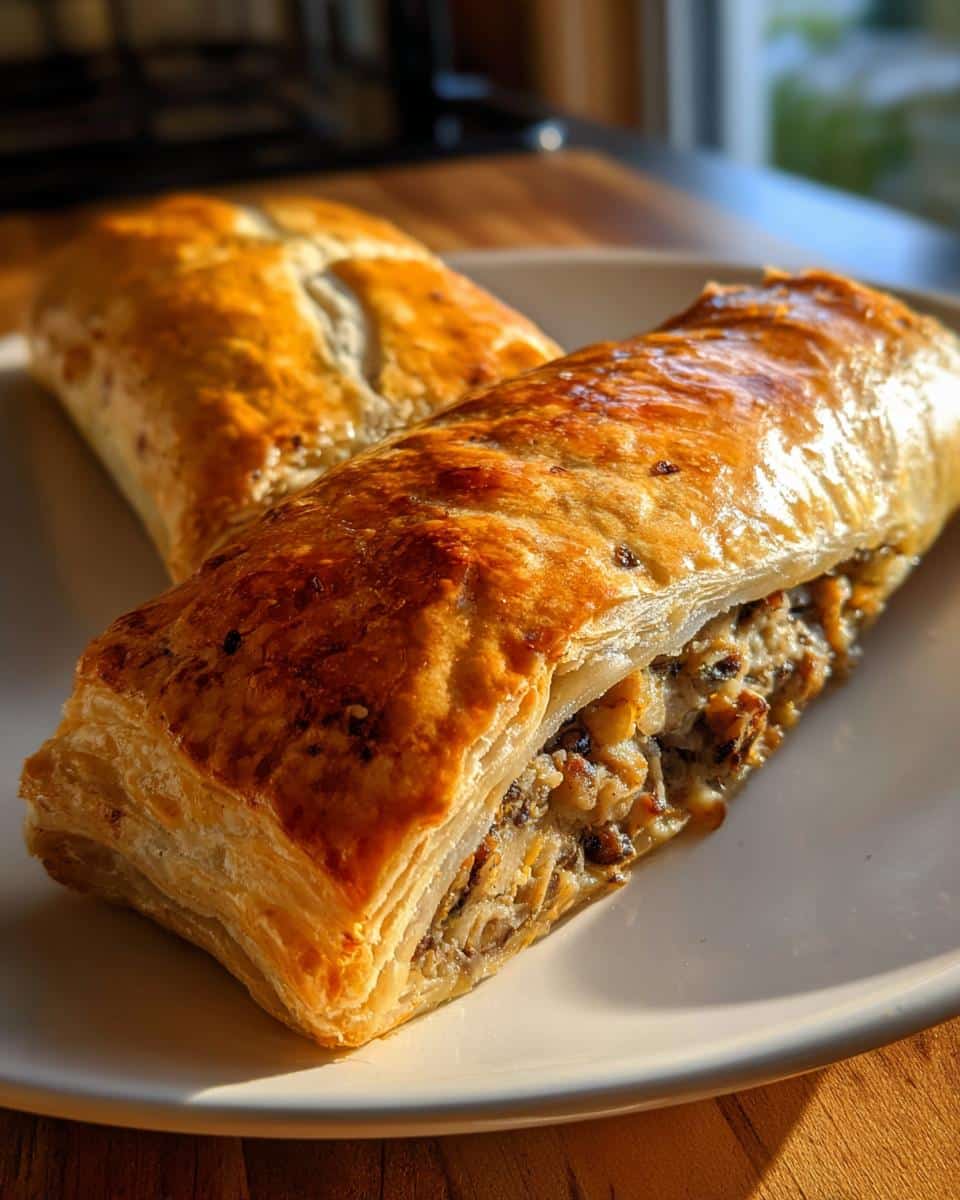
Oh, let me tell you about my absolute favorite vegetarian showstopper—this incredible lentil mushroom Wellington! It’s the kind of dish that makes everyone at the table go “Wow, you MADE this?” while secretly hoping for seconds. The first time I served it at a dinner party, my meat-loving uncle actually asked for the recipe—that’s how good it is. Flaky golden puff pastry wrapped around a hearty, earthy filling of lentils and mushrooms? Pure magic. It’s become my go-to when I need something fancy but deceptively easy, and trust me, the smell alone will have your kitchen feeling like a five-star restaurant.
Why You’ll Love This Lentil Mushroom Wellington
This isn’t just any vegetarian dish—it’s the kind of recipe that’ll make you feel like a kitchen wizard. Here’s why it’s become my secret weapon:
- It looks fancy but couldn’t be easier – Puff pastry does all the hard work, transforming simple ingredients into a golden, flaky masterpiece that looks straight from a bakery case
- That rich, meaty flavor without the meat – The combo of earthy mushrooms and hearty lentils (with all those herbs!) gives you that satisfying umami punch even carnivores adore
- Perfect for make-ahead magic – Assemble it in the morning, pop it in the fridge, and just bake when guests arrive—no last-minute stress!
- Leftovers? What leftovers? – It reheats beautifully, making next-day lunches feel like a treat (though in my house, we rarely have any left to save)
Seriously, this Wellington has saved me during holiday dinners, potlucks, and “I forgot we had people coming over” moments more times than I can count.
Ingredients for Lentil Mushroom Wellington
Okay, let’s gather our cast of characters! Here’s everything you’ll need to make this beauty come together. I’ve learned through trial and error that quality matters here – especially with the puff pastry (more on that later).
- 1 cup cooked lentils – I usually cook mine from dry (about 1/3 cup uncooked), but canned works great in a pinch! Just drain and rinse them well
- 2 cups chopped mushrooms – Cremini are my favorite for their meaty texture, but white buttons work too. Chop them small so they blend beautifully with the lentils
- 1 onion, diced – Yellow onions are perfect here, but I’ve used shallots when I’m feeling fancy
- 2 cloves garlic, minced – Fresh is best! That pre-minced stuff just doesn’t give the same flavor punch
- 1 tbsp olive oil – For sautéing our veggies to golden perfection
- 1 tsp thyme – Dried works fine, but fresh thyme leaves? *chef’s kiss*
- 1 tsp rosemary – Crush it between your fingers before adding to release those amazing oils
- 1 sheet puff pastry – The star of the show! Keep it cold until the very last minute – I’ve learned that lesson the hard way
- 1 egg – Just for that gorgeous golden egg wash. Save the yolk-heavy eggs for this – they give the best color
- Salt and pepper to taste – Don’t be shy! This filling needs proper seasoning
See? Nothing too crazy. Most of this is probably already in your kitchen. Now let’s make some magic!
How to Make Lentil Mushroom Wellington
Alright, let’s get cooking! I promise this is easier than it looks – just follow these simple steps, and you’ll have a showstopper on your hands. The key is taking it one step at a time, and don’t worry if your pastry isn’t perfect (mine never is!).
Preparing the Filling
First things first – turn that oven to 375°F (190°C) so it’s nice and hot when we’re ready. Now, let’s make that incredible filling that’ll have everyone asking for seconds!
Grab your favorite skillet (I always use my trusty cast iron) and heat up the olive oil over medium heat. Toss in those diced onions and let them get soft and translucent – about 3 minutes should do it. Then add the garlic (careful not to burn it!) and stir for just 30 seconds until that amazing smell hits you.
Now the fun part – dump in those chopped mushrooms! I like to press them down slightly to help release their juices. Cook them until they’re golden and most of their liquid has evaporated – about 5-7 minutes total. Then stir in the cooked lentils, thyme, rosemary, and a good pinch of salt and pepper. Let everything get cozy together for another minute or two, then take it off the heat. Taste it – this is your chance to adjust seasonings before it’s wrapped in pastry!
Assembling the Wellington
Here’s where the magic happens! Unroll your puff pastry on a lightly floured surface (or parchment paper if you’re messy like me). Roll it out just slightly to smooth any cracks – no need to go crazy, we’re not making croissants here.
Spoon your lentil-mushroom mixture down the center, leaving about 2 inches at either end. Now, fold those ends up first (like you’re wrapping a present), then carefully bring the long sides together, overlapping slightly. Press to seal – use a little water on your fingers if needed to make it stick. Flip it seam-side down onto a baking sheet lined with parchment.
Now for that gorgeous golden finish – beat your egg with a teaspoon of water and brush it all over the pastry. Get fancy with some decorative slits on top if you’re feeling artistic (I usually make three diagonal cuts – looks pro with zero effort!).
Baking and Resting
Into the oven it goes! Bake for 25-30 minutes until that pastry is puffed and deeply golden. Your kitchen will smell UNREAL. Here’s the hardest part – let it rest for at least 5 minutes before slicing. I know, I know – but trust me, this keeps all that delicious filling from oozing out when you cut into it!
When you finally slice in, that first peek at the layers of flaky pastry hugging the savory filling? Pure bliss. Serve it up and get ready for the compliments to roll in!
Tips for the Perfect Lentil Mushroom Wellington
After making this Wellington more times than I can count (and learning from all my mistakes!), here are my absolute must-know tricks for getting it perfect every single time:
- Keep that pastry COLD – I can’t stress this enough! Warm puff pastry turns into a sticky mess. Only take it out of the fridge right before assembly, and if your kitchen’s warm, work fast. If the dough gets too soft while you’re working, pop the whole tray in the fridge for 10 minutes before baking.
- Chop, don’t slice your mushrooms – Tiny mushroom pieces (about pea-sized) blend beautifully with the lentils and create the perfect texture. Big chunks make the filling lumpy and harder to wrap. I use my mezzaluna chopper for this – total game changer!
- Dry filling is happy filling – After cooking your mushroom mixture, let it cool slightly and check for excess moisture. If it looks wet, drain it briefly in a sieve or pat with paper towels. Soggy filling = soggy pastry bottom, and nobody wants that.
- Egg wash magic – That golden sheen isn’t just pretty – it helps seal the edges too! For extra crispness, do a second light egg wash halfway through baking (just open the oven quickly and brush again). My grandma’s secret? Add a pinch of turmeric to the egg wash for deeper color!
Bonus tip from my last kitchen disaster: If your pastry tears while wrapping? No panic! Just patch it with a small piece of leftover dough and seal with egg wash – it’ll bake up perfectly and no one will ever know.
Ingredient Substitutions
Listen, I know we don’t all have the same pantry staples, and sometimes you just need to make do with what you’ve got! Here are my favorite tried-and-true swaps that keep this Wellington delicious even when improvising:
- No lentils? No problem! – Brown or green lentils work best, but in a pinch, I’ve used beluga lentils (they hold shape beautifully) or even canned lentils (just drain and rinse them really well). If you’re really stuck, cooked brown rice or quinoa can stand in, though the texture will be different.
- Mushroom medley – While cremini are my go-to, this is where you can get creative! I’ve made amazing versions with shiitakes (remove those tough stems!), portobellos (chopped extra fine), or even a mix of wild mushrooms when they’re in season. Dried mushrooms work too – just soak 1/2 cup in hot water for 20 minutes, chop, and use the soaking liquid to deglaze the pan for extra flavor!
- Herb alternatives – That thyme-rosemary combo is classic, but sage gives such a warm, earthy note (use 1/2 the amount as it’s stronger). No fresh herbs? Dried works fine – just use 1/3 less since they’re more concentrated. Once I even used Herbes de Provence when my rosemary jar was empty, and it was delicious!
- Pastry shortcuts – Homemade puff pastry is amazing, but who has time? Store-bought is absolutely fine (I always keep a box in my freezer for emergencies). Phyllo dough works in a pinch too – just layer 4-5 sheets with melted butter between them before wrapping. Not as flaky, but still crispy and delicious.
Remember, cooking is about making it work for YOU. The first time I made this, I completely forgot the rosemary and used shallots instead of onions – still got rave reviews! The key is balancing flavors and textures – as long as you’ve got something earthy, something savory, and that beautiful crispy shell, you’re golden.
Serving Suggestions
Now comes the best part – showing off your masterpiece! I’ve served this Wellington at everything from casual weeknight dinners to fancy holiday meals, and here’s what always gets people reaching for seconds:
- The classic combo – Pair slices with simple roasted carrots and parsnips (tossed in olive oil, salt, and a drizzle of maple syrup). The sweetness balances the savory Wellington perfectly. Add a dollop of whole grain mustard on the side for dipping – trust me on this one!
- For a lighter meal – Serve atop a big pile of peppery arugula dressed lightly with lemon juice and olive oil. The crisp freshness cuts through the rich pastry beautifully. My secret? Add some toasted walnuts for crunch!
- Holiday showstopper style – When I want to impress, I arrange slices on a platter surrounded by roasted Brussels sprouts and rainbow baby potatoes. A little bowl of mushroom gravy for drizzling takes it over the top (and makes it feel extra festive).
- Unexpected but amazing – Last Thanksgiving, I served leftover Wellington with homemade cranberry sauce on the side, and now my family demands it that way every time! The tart-sweetness works shockingly well with the earthy filling.
My favorite way? Straight from the oven with nothing but a fork and maybe a glass of red wine. Sometimes simplicity is best when that golden pastry is still crackling hot!
Storing and Reheating Lentil Mushroom Wellington
Okay, let’s talk leftovers – not that you’ll have many! This Wellington keeps surprisingly well, and I’ve perfected the art of bringing it back to life so it tastes just-baked. Here’s everything I’ve learned about storing and reheating it without losing that magical crispiness.
Fridge Storage (Short-Term)
If you’ve got leftovers (lucky you!), let the Wellington cool completely before wrapping. I like to slice mine first – that way I can grab just what I need later. Wrap individual slices tightly in foil or store the whole thing in an airtight container. It’ll stay fresh in the fridge for 3 days max – after that, the pastry starts getting soggy (though the filling still tastes great!).
Pro tip from my many tests: Place a paper towel under the slices in the container to absorb any excess moisture. And whatever you do, don’t microwave it straight from the fridge – we’re better than that!
Freezer Storage (Long-Term)
This is where this recipe really shines! You can freeze it either before or after baking:
- Unbaked – Assemble the Wellington completely (egg wash and all), wrap tightly in plastic, then foil, and freeze for up to 2 months. When ready, bake straight from frozen – just add 10-15 extra minutes to the cooking time.
- Baked – Let it cool completely, then wrap slices individually in plastic before placing in a freezer bag. They’ll keep beautifully for 1 month. Thaw overnight in the fridge before reheating.
I always keep one unbaked Wellington in my freezer for last-minute guests – it’s saved my bacon more times than I can count!
Reheating Like a Pro
Here’s the secret to bringing back that just-baked magic: your oven is your best friend. For fridge-stored slices:
- Preheat oven to 350°F (175°C)
- Place slices on a baking sheet (no need to thaw if frozen)
- Spritz lightly with water or brush with a tiny bit of melted butter
- Bake for 8-10 minutes (12-15 if frozen) until heated through and crispy
For an extra-crispy bottom, place the slices directly on the oven rack for the last 2 minutes. And if you’re reheating a whole Wellington? Wrap in foil and bake at 325°F (160°C) for 15-20 minutes, then unwrap and bake 5 more minutes to crisp up.
Yes, it takes longer than microwaving, but that first bite of flaky, reheated perfection? Totally worth the wait. My husband actually prefers day-old Wellington because the flavors meld even more – shh, don’t tell anyone!
Nutrition Information
Let’s talk numbers – because as delicious as this Wellington is, it’s nice to know what you’re eating! Here’s the nutritional breakdown per serving (about 1 slice), but remember – these are estimates and can vary based on your specific ingredients and how generous you are with that puff pastry!
- Calories: 320 – Not bad for such a satisfying main dish!
- Protein: 10g – Those lentils really pull their weight
- Carbs: 30g – Mostly from the wholesome lentils and that flaky pastry
- Fiber: 6g – Thanks to our lentil and mushroom friends
- Sugar: 2g – Just a hint from the caramelized veggies
- Fat: 18g – Hey, puff pastry is worth it – and 12g is the good unsaturated kind
- Saturated Fat: 4g – That’s less than most beef Wellingtons!
- Sodium: 280mg – Easy to reduce if you use low-sodium lentils
- Cholesterol: 25mg – Only from that beautiful golden egg wash
Important note: These values can swing based on your puff pastry brand, whether you use oil or butter for sautéing, and how much salt you add. I once calculated my “generous slice” version at a dinner party and… let’s just say sometimes it’s better not to know!
The great thing? This is packed with plant-based protein and fiber that’ll keep you full for hours. I often serve it with a big salad to balance things out – but honestly? Sometimes that flaky pastry deserves to be enjoyed guilt-free!
Common Questions About Lentil Mushroom Wellington
I get asked about this recipe ALL the time – turns out everyone wants to know the secrets to Wellington success! Here are the questions that pop up most often, along with all my hard-earned tips from years of making (and occasionally messing up) this dish:
Can I make the Wellington ahead of time?
Absolutely! This is one of my favorite make-ahead tricks. Assemble the whole thing (egg wash and all), wrap tightly in plastic, and refrigerate for up to 24 hours before baking. When ready, just pop it straight into the preheated oven – no need to adjust cooking time. The cold might add 2-3 extra minutes, but that’s it! I’ve done this for countless dinner parties and it’s a lifesaver.
Help! My puff pastry is tearing – what do I do?
First, don’t panic! Puff pastry can be tricky, especially when you’re new to working with it. If you get small tears, just patch them with a little extra dough (use trimmings from the edges) and seal with a dab of egg wash. For bigger issues? Roll it back up, chill for 15 minutes, and try again. My first Wellington looked like it survived a war – but it still tasted amazing!
Can I freeze leftovers?
You bet! Cool completely, then wrap individual slices tightly in plastic wrap before placing in a freezer bag. They’ll keep for 1 month. To reheat, no need to thaw – just bake frozen slices at 350°F (175°C) for 12-15 minutes until crispy. Pro tip: Freeze unbaked Wellington too – wrap well and bake from frozen, adding 10-15 minutes to the usual time.
What if I don’t eat eggs?
No problem! For the filling, just leave it out – the lentils and mushrooms bind together beautifully on their own. For that golden top, brush with olive oil or melted vegan butter instead of egg wash. It won’t brown quite as deeply, but it’ll still be delicious. I’ve also had success with aquafaba (chickpea water) brushed on lightly.
Why does my Wellington get soggy on the bottom?
Ah, the dreaded soggy bottom! Two likely culprits: 1) Your filling had too much moisture (make sure to cook off all that mushroom liquid), or 2) You didn’t use parchment paper (the pastry sticks and steams). My foolproof fix? Place a baking sheet in the oven while it preheats, then put your parchment-lined Wellington on the hot sheet – gives the bottom crust an extra crisp boost!
Remember – even “imperfect” Wellingtons taste incredible. My first attempt looked like a pastry crime scene but disappeared faster than you’d believe. Happy cooking!
Print
Irresistible Lentil Mushroom Wellington Recipe in 5 Easy Steps
- Total Time: 45 minutes
- Yield: 4 servings
- Diet: Vegetarian
Description
A hearty and flavorful vegetarian dish featuring lentils and mushrooms wrapped in puff pastry.
Ingredients
- 1 cup cooked lentils
- 2 cups chopped mushrooms
- 1 onion, diced
- 2 cloves garlic, minced
- 1 tbsp olive oil
- 1 tsp thyme
- 1 tsp rosemary
- 1 sheet puff pastry
- 1 egg (for egg wash)
- Salt and pepper to taste
Instructions
- Preheat oven to 375°F (190°C).
- Sauté onion and garlic in olive oil until soft.
- Add mushrooms, lentils, thyme, rosemary, salt, and pepper. Cook for 5-7 minutes.
- Roll out puff pastry and spread the lentil-mushroom mixture in the center.
- Fold the pastry over the filling and seal edges.
- Brush with egg wash and bake for 25-30 minutes until golden brown.
- Let cool slightly before slicing.
Notes
- Use pre-cooked lentils for faster prep.
- Chop mushrooms finely for even cooking.
- Let the Wellington rest before cutting to prevent crumbling.
- Prep Time: 15 minutes
- Cook Time: 30 minutes
- Category: Main Dish
- Method: Baking
- Cuisine: Vegetarian



